Well, in the blink of an eye it’s that time of the year again!
I hope all of you have had an excellent 2017 thus far, and enjoy a well deserved break if you are lucky enough to have some time off over the Christmas and New Year period.
Thanks for all of your support and the fabulous interaction of which I have thoroughly enjoyed, and look forward to more of in the new year.
Super lucky to of found this amazing sample book of vinyl upholstery for transport and upholstery trades just last week.
Great selection!
Dating from the 1950’s the book contains 60+ samples of vinyl showcasing different textures, patterns, colours and finishes.
Nice blurb
See just a small selection below.
How good!
It’s amazing to recognise so many of the patterns and colours from the book on different pieces of furniture I’ve dealt with over the last 10+ years. However I must say my favourite was towards the rear of the book, and appears to of been a late inclusion as it is fixed differently to the other samples.
Mid Century Madness!
As you can see, this finish is called ‘Satellite’ and definitely has a strong atomic influence. Reminds me very much of those 1950’s French coat/cloth/hat racks by Roger Feraud.
I thought I’d start off the year by sharing a little personal project around the house that I’ve recently completed as it fits in perfectly with our ideals, which is saving items from the 20th Century and giving them another lease on life!
You see, we’ve got a small drop off just outside our back veranda, and with a new little woofer on the way I was after a small bit of fencing to stop him getting into bad habits of jumping/falling off the edge.
So one day whilst browsing a scrap metal/recycle yard I came across this great little section of 1960’s fencing (love this design!). As soon as I saw it I knew I had the perfect spot for it so after exchanging a $10 note home it came to get measured up.
Ready for the scrap heap……
After a few small modifications (few brackets added to mount in its new position) the tedious task of removing the old paint, cleaning, then undercoating was here. After a few enjoyable hours it was now ready to be positioned and fixed into place.
Time consuming to do correctly!
Once mounted, I then completed the job by applying 2 coats of an exterior paint (woodland grey) to match our window frames. Although the colours slightly differ to 50 years ago they still work extremely well with it’s design (let’s be honest – any colour would look good on it!)
Super Happy!
So there you have it folks, a great piece of 1960’s design fencing, a $10 note, some elbow grease and paint makes for a job well done whilst adhering to our status quo.
Well, in the blink of an eye it’s that time of the year again!
I hope all of you have had an excellent 2016 thus far, and enjoy a well deserved break if you are lucky enough to have some time off over the Christmas and New Year period.
Thanks for all of your support and the fabulous interaction of which I have thoroughly enjoyed, and look forward to more of in the new year.
We will be taking a break from the online side of things for a few weeks, however will still be contactable via email & mobile (just may be a little slow in replying).
Yes, what indeed are we looking at……………………? Well if we pan back a little, you’ll see that we are feasting our eyes on some amazing etched glass doors that depicts a lovely forest scene with everyone’s favourite mid century animal – deer! And not just one, but 3! Buckincluded!
Full Scene!
I’d dare to have a guess and say that they didn’t quite match the new style that the renovators in question had in mind for their 1950/60’s home so out they came, and luckily for some, straight into my arms!
Doors and shower screens seem to be the most common areas to find these etched glass images, ranging from mermaids to bushmen, under water fish to ships however I’ve rarely seen such a large scene stretched across 2 doors and its 2 sidelights.
With no active plans for them at this stage, I think I’ll just store them until I find a use, or alternatively, until someone comes across this post, falls in love and wants them for their own home restoration! If thats you, contact me here.
With the bedside sanded and ready for the finish to be applied I wasted no time in applying some Cabots Danish Oil. I decided to go with the Danish Oil as from previous experiences I like the protection/slight hardness it gives and it’s neutral colour which really lets the blonde QLD maple grain shine through.
Before and After!
4 thin coats were applied using a cotton cloth, with each coat being lightly sanded with some 800 grit wet and dry sandpaper before the next was applied.
Finished.
The results were pretty great! Lovely tones however with a varying contrast due to the timbers used, which leads me to think that the original orange/?/stain/shellac applied was probably more so to ensure that all pieces were uniform in their colouring due to the varying timbers used………Give me the au naturel look any day!
At the end of my last update I had removed the base/legs and was continuing to prepare the bedside for it’s new finish.
Sorry about the shadows!
With the bedside now in pieces I could get stuck into some fine veneer repairs along with the final preparation of the timber surfaces before reassembly. As mentioned previously due to the thin nature of the veneer, patience is a must when sanding, 240 grit to start, 320 grit to finish.
Getting there
Reassembly was pretty straight forward, fresh wood glue, and with the existing screws and holes all lining up it went back together like a jigsaw puzzle, just lucky I numbered each piece!
Sanded, assembled and ready for a new finish
Once the glue had dried, a very light final sand with some 400 grit wet and dry was carried out in preparation for the Danish Oil to be applied.
I’ve been sitting on this Summertone bedside for a little while in the hope of finding its matching partner. Unfortunately I haven’t been so lucky as of yet, however in preparation for a larger restoration job I’ve decided to trial a few different techniques and finishes on it.
Excuse the grass!
Wanting to get away from that orange tinge I’ll be removing the original shellac finish and tint and going with a neutral finish to show off that wonderful golden QLD maple veneer. Seeing as though I’ve only got 1mm or less in thickness to work with I’ll be using a cabinet scraper and metho/steel wool to keep the sanding to a minimum.
Night and Day?
Already you can see the huge difference between the natural colour of the stripped back drawer front and the original finish to the body of the bedside. To make things easier, I’ve removed the legs and base supports and as these are solid timber the electric sander should make light work of them.
Hoping to get through the restoration within a week or two so be sure to check back and see how things progress!
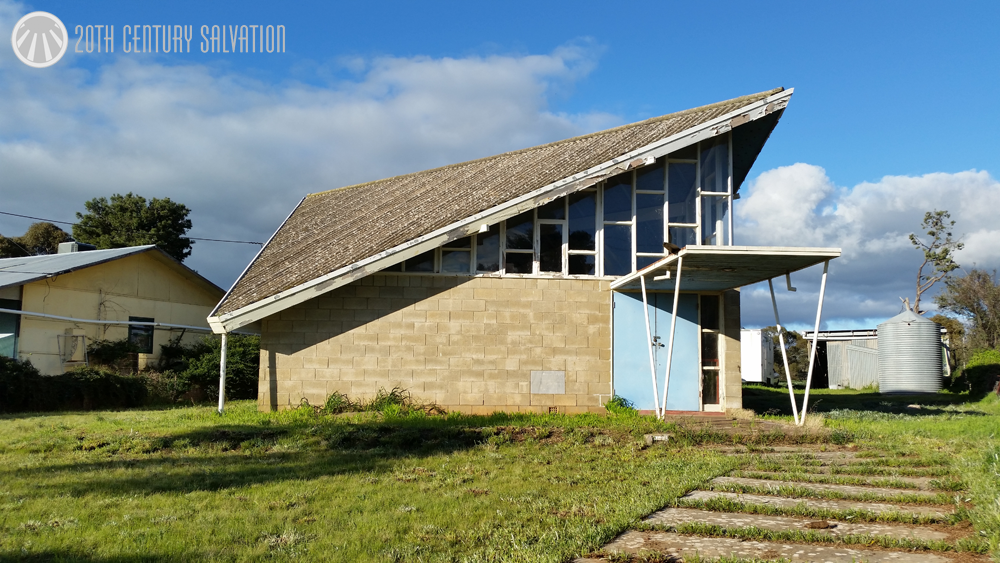
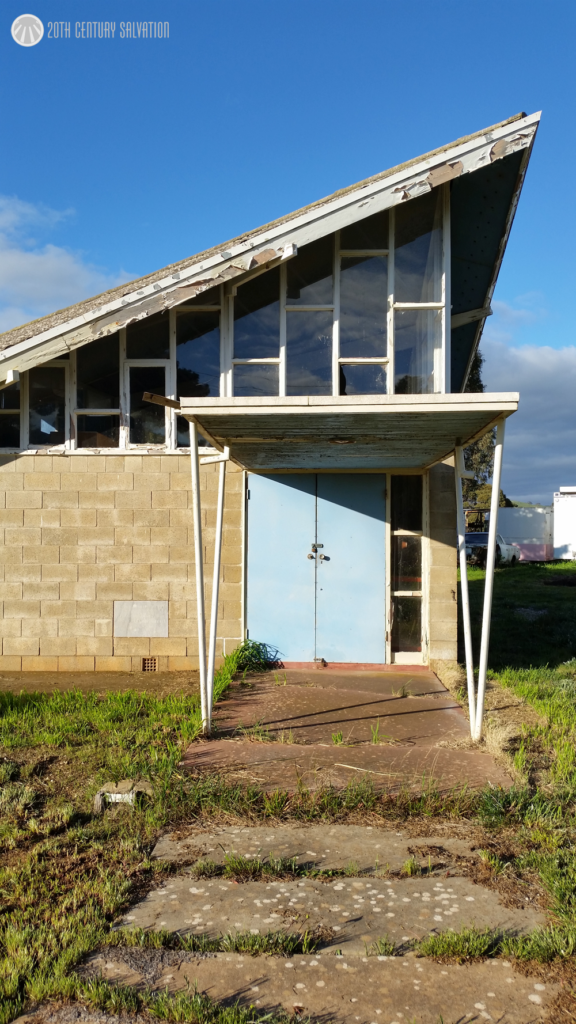
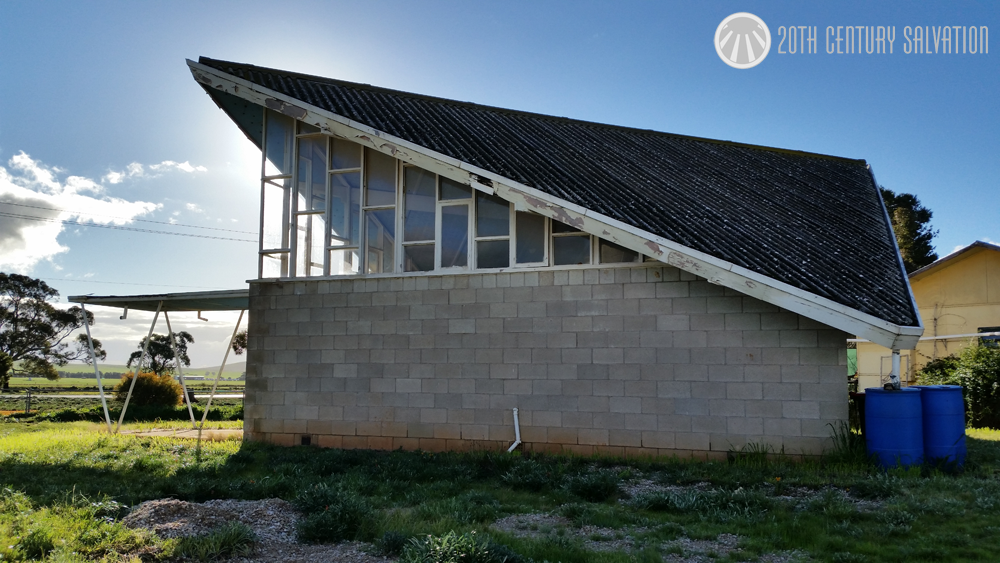
A few weeks ago I was in S.A for work, and whilst travelling to my destination I passed an absolutely amazing piece of Mid Century architecture in possibly the most uncommon place.
Now I’m no expert by any stretch of the imagination when it comes to mid century architecture, and I know that you know my core business is mid century furniture and home decor, however I had to share, especially after a reasonable search online brought up practically no information or images.
Surrounded by vast grazing/cropping pastures and century + old stone buildings Hallett was the last place I’d ever expect to see such a building.
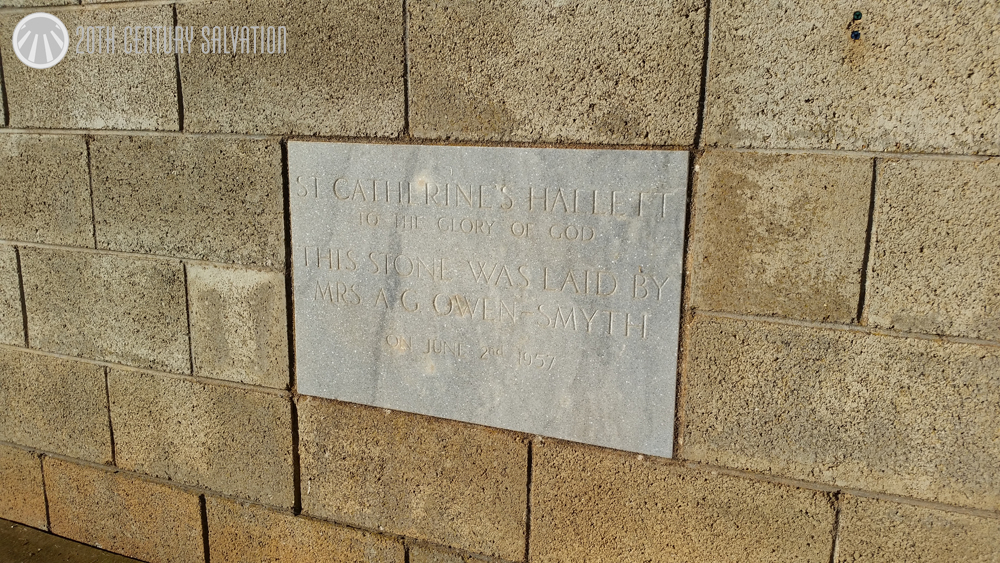
After rubbernecking like I never have before, a swift U’bolt was undertaken to have a closer look. The foundation stone provides an exact date – 1957. And the little information I found online describes the Church of England consecrating St Catherines of Sienna on the 15th September 1957. It was officially closed in 2003 when it was sold and is now a private residence.
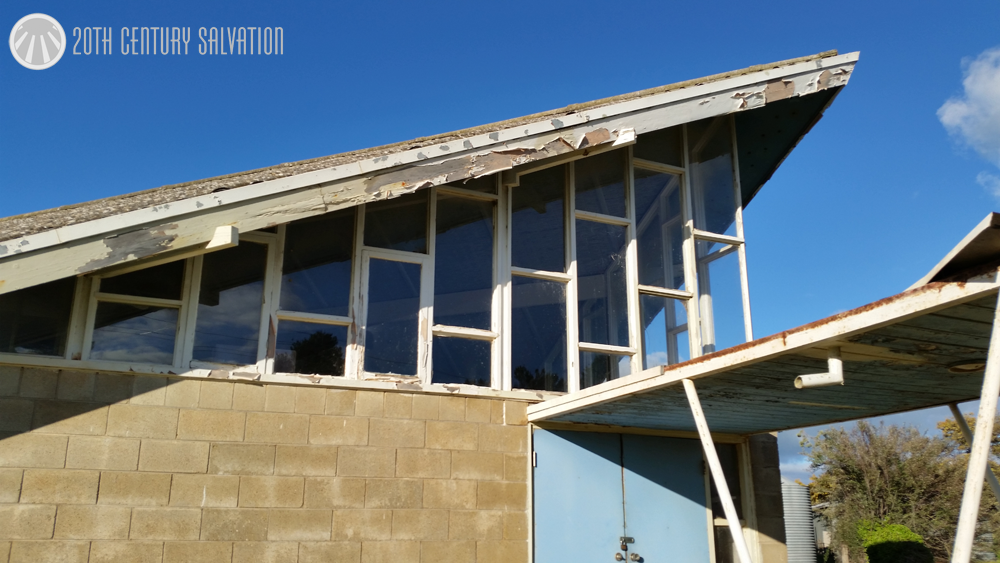
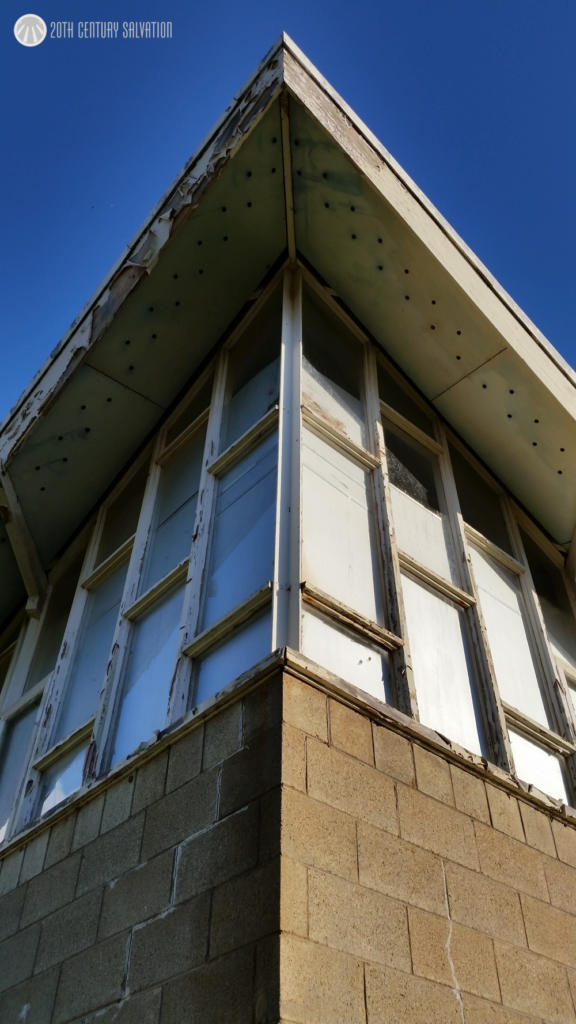
Unfortunately it needs some serious attention, and currently appears to be only used as storage.
aCUTE!
I can only imagine how magnificent the inside space would of been in it’s day with all that natural light flooding in. A heavenly experience in a far out building I’m sure.
#NoFilter
If you’re ever in the region, you can find it yourself just before/past the Toolangi road turnoff on the Barrier Highway.
After a little too long between posts, I’ve returned to share a nice little save from a local recycle centre over the weekend. The acute angled legs instantly caught my attention, and after a brief inspection (more so to see if their missing pal # 4 was floating about somewhere else – but to no avail!) I loaded them up and away I went.
0, 45, 90.
They definitely look familiar, and I’m sure I’ve spotted them somewhere online (either for sale or in an old furniture catalogue) however at this moment they remain unidentified.
Strengthening brace – weakening style…..
From the images you can probably see that added support from the front to back legs on either side that looks out of place. It’s definitely a later addition, and after a quick hit with the heat gun to remove those multiple layers of paint you can see the difference in timbers used. The angled leg (and rest of the chair) is a beautiful Queensland maple, whilst the support appears to be a pine, possibly Kauri looking at the grain. It’ll be removed in due time when tackling a full blown restoration on all 3. Not for the faint hearted, and definitely lots of work, but the finished product will be worth it.