Category Archives: Restoration Projects

Category for items that will be/have been restored.

Scrap Metal

Welcome to 2017! (Although 6 weeks late………)

I thought I’d start off the year by sharing a little personal project around the house that I’ve recently completed as it fits in perfectly with our ideals, which is saving items from the 20th Century and giving them another lease on life!

You see, we’ve got a small drop off just outside our back veranda, and with a new little woofer on the way I was after a small bit of fencing to stop him getting into bad habits of jumping/falling off the edge.

So one day whilst browsing a scrap metal/recycle yard I came across this great little section of 1960’s fencing (love this design!). As soon as I saw it I knew I had the perfect spot for it so after exchanging a $10 note home it came to get measured up.

Rusty gold *puke
Ready for the scrap heap……

After a few small modifications (few brackets added to mount in its new position) the tedious task of removing the old paint, cleaning, then undercoating was here. After a few enjoyable hours it was now ready to be positioned and fixed into place.

Geometric mid century fencing design
Time consuming to do correctly!

Once mounted, I then completed the job by applying 2 coats of an exterior paint (woodland grey) to match our window frames. Although the colours slightly differ to 50 years ago they still work extremely well with it’s design (let’s be honest – any colour would look good on it!)

Triangles 1960's Pattern
Super Happy!

So there you have it folks, a great piece of 1960’s design fencing, a $10 note, some elbow grease and paint makes for a job well done whilst adhering to our status quo.

Summertone Bedside – Part 3

With the bedside sanded and ready for the finish to be applied I wasted no time in applying some Cabots Danish Oil. I decided to go with the Danish Oil as from previous experiences I like the protection/slight hardness it gives and it’s neutral colour which really lets the blonde QLD maple grain shine through.

Night and day?
Before and After!

4 thin coats were applied using a cotton cloth, with each coat being lightly sanded with some 800 grit wet and dry sandpaper before the next was applied.

Mid Century Australian Furniture
Finished.

The results were pretty great! Lovely tones however with a varying contrast due to the timbers used, which leads me to think that the original orange/?/stain/shellac applied was probably more so to ensure that all pieces were uniform in their colouring due to the varying timbers used………Give me the au naturel look any day!

Until next time.

Retro Australian Bedside
Gleaming

by Summertone.

Summertone Bedside – Part 2

At the end of my last update I had removed the base/legs and was continuing to prepare the bedside for it’s new finish.

1950's bedside restoration
Sorry about the shadows!

With the bedside now in pieces I could get stuck into some fine veneer repairs along with the final preparation of the timber surfaces before reassembly.  As mentioned previously due to the thin nature of the veneer, patience is a must when sanding,  240 grit to start, 320 grit to finish.

Prepped and ready to go
Getting there

Reassembly was pretty straight forward, fresh wood glue, and with the existing screws and holes all lining up it went back together like a jigsaw puzzle, just lucky I numbered each piece!

Mid Century Bedside
Sanded, assembled and ready for a new finish

Once the glue had dried, a very light final sand with some 400 grit wet and dry was carried out in preparation for the Danish Oil to be applied.

Next up – the finished product!

Summertone Bedside

I’ve been sitting on this Summertone bedside for a little while in the hope of finding its matching partner. Unfortunately I haven’t been so lucky as of yet, however in preparation for a larger restoration job I’ve decided to trial a few different techniques and finishes on it.

1950's Australian Bedside
Excuse the grass!

Wanting to get away from that orange tinge I’ll be removing the original shellac finish and tint and going with a neutral finish to show off that wonderful golden QLD maple veneer. Seeing as though I’ve only got 1mm or less in thickness to work with I’ll be using a cabinet scraper and metho/steel wool to keep the sanding to a minimum.

Mid Century Bedside
Night and Day?

Already you can see the huge difference between the natural colour of the stripped back drawer front and the original finish to the body of the bedside. To make things easier, I’ve removed the legs and base supports and as these are solid timber the electric sander should make light work of them.

Hoping to get through the restoration within a week or two so be sure to check back and see how things progress!

Killer Kitchen Chairs!

After a little too long between posts, I’ve returned to share a nice little save from a local recycle centre over the weekend. The acute angled legs instantly caught my attention, and after a brief inspection (more so to see if their missing pal # 4 was floating about somewhere else – but to no avail!) I loaded them up and away I went.

1950's Australian Dining Chairs
0, 45, 90.

They definitely look familiar, and I’m sure I’ve spotted them somewhere online (either for sale or in an old furniture catalogue) however at this moment they remain unidentified.

Mid Century Modern Chair
Strengthening brace – weakening style…..

From the images you can probably see that added support from the front to back legs on either side that looks out of place. It’s definitely a later addition, and after a quick hit with the heat gun to remove those multiple layers of paint you can see the difference in timbers used. The angled leg (and rest of the chair) is a beautiful Queensland maple, whilst the support appears to be a pine, possibly Kauri looking at the grain. It’ll be removed in due time when tackling a full blown restoration on all 3. Not for the faint hearted, and definitely lots of work, but the finished product will be worth it.

1950's kitchen chair
Ones original, ones not!

1950’s Bedside Repairs – Take 3

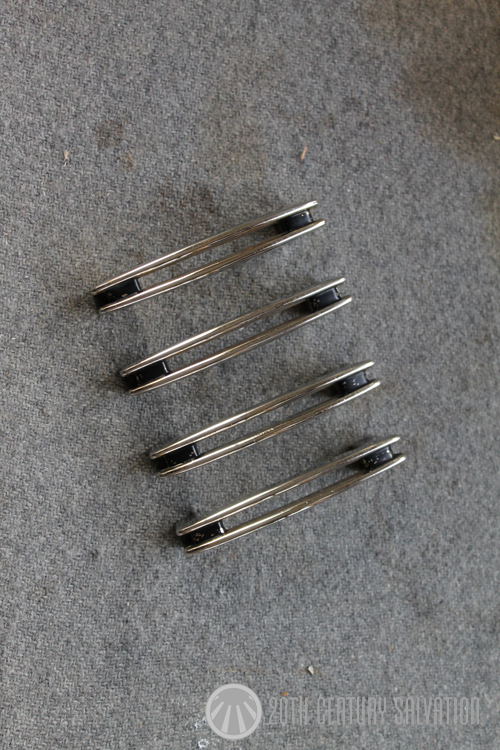
With the repairs done, and the finish applied, it was time to fit the new (old) period handles.

1950's Bedside Repairs
Matches very well!

As you can see the handles worked out very well. The repairs also quite good! A little hard to match perfectly in some areas however overall I’m very happy, a huge improve on the original handles.

So how do they look…………..? See below.

Repaired, cleaned, and ready to go!
Nice stance.

Soon to be available to purchase @ 20thcenturysalvation.com.au

1950’s Bedside Repairs – Take 2

Continuing on from my last post, the repairs to the 1950’s bedsides have been completed.

1950's Australian Bedsides
Almost done!

I was reasonably happy with how the veneer patching turned out. Once the glue dried, I dotted the fresh veneer with a dark stain (walnut) to help give it a little colour, and after a light sand, I again spotted the repairs with a varnish/thinner mixture to build it up a little. It was after this I then realised I wasn’t happy with the overall finish on the door and drawer fronts. Cue some 240 grit wet and dry. This smoothed out the original finish, and gave a good base to then apply 2 final coats of the varnish/thinner mixture.

Mid Century Drawer Pulls
Polished and ready to fit.

With the repairs done, it was time to polish the new (old) door and drawer handles in preparation for fitting!

1950’s Bedside Repairs

I came across this neat little set of bedside tables on the weekend. Ever popular, and judging by the style, I’d imagine they date from the 1950’s. Cube shaped, and sitting atop a 4 legged base, the compartments comprise of a single drawer and cupboard space.

Mid Century Bedsides
45 degree chamfered edges

It looks like they’ve previously had a refurbish, and unfortunately the handle choice leaves a little………or a lot to be desired! Just not the correct style for the piece. Luckily I was able to find 4 period specific matching handles that should look quite good. More on those next post.

Mid Century Australian Bedside tables.
Super fine cut and paste!

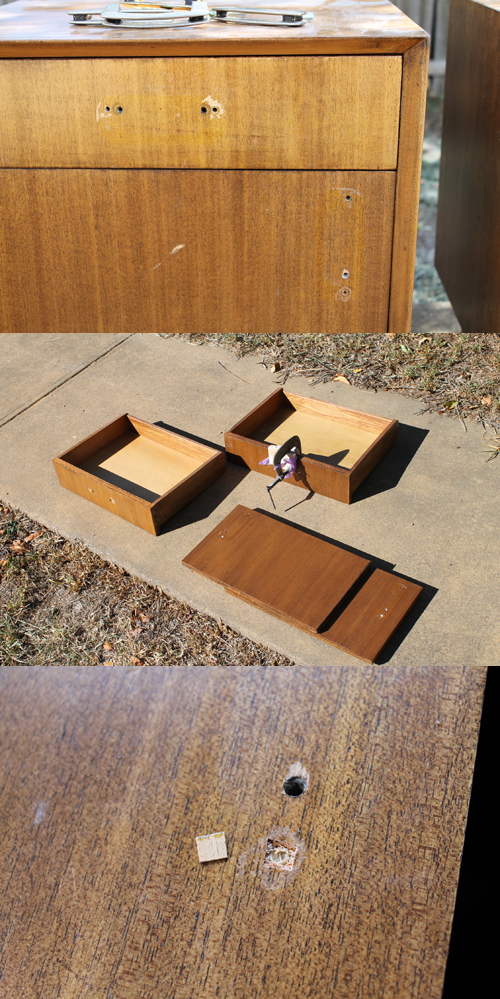
Now for the fun part. The current handles had to have 2 extra holes drilled in each drawer, and 1 extra in each cupboard door because the centres for the screw holes were wider apart than the original handles (6 holes in total to patch). Secondly, whilst removing the handles, they removed some of the finish and stain due to whatever glue they used to attach them. Double Whammy! Thanks for coming! LOL.  All good, I’ll sort it!

I started off by glueing some 6mm dowel pieces in place of the old handle screw holes. This will help give a solid backing to the small pieces of maple veneer I’ll cut and paste. A super sharp razor blade and small rule then helped to size the veneer up perfectly which was ‘borrowed’ from the rear/bottom of the drawer fascia. It should mean that once I’ve reapplied some stain, it will match very well. Fingers crossed of course!

More progress next blog post!

Stool Re manufacture

If you’ve browsed our online store, you may of noticed in the ‘Coming Soon’ section I’ve had a T.H Brown fondue coffee table and stool set sitting there for perhaps a little too long. The table and glass are in great condition, and were not the hold up! It was/is the 3 stools.

You see, unfortunately the original woollen upholstery is well worn and needs to be recovered. Not overly hard no. However when I started to pull one apart all those months/ years ago…..eeek I was not overly impressed with the condition, or materials used for the frame of each stool. This was a tad surprising given the reputation for furniture items manufactured by T.H Brown however I guess if it’s not to be seen, and does the job for 20 or 30 years what’s the problem? Save costs where they can…………

Anyways, back to the stools. As you can see from the images below 10mm particle board was used, along with some rough cut pine which was all held together with a few nails. Time and moisture have played their part which left the frames in pretty poor and unstable condition. There’s no way you’d ever apply new upholstery over the top! So before moving ahead I wanted to re manufacture the frames for the 3 stools to a higher quality than what was there before, to ensure they’ll last for as long as is required!

T.H Brown Fondue Table
Nice Sundays Work!

I used the base from one of the stools as a template to ensure I ended up with the same shape. This shape was traced onto 12mm plywood (much preferred than particle board although double the cost $$), 42mm x 18mm pine along with some 50mm long screws, nails, and wood glue will provide a plenty solid and long lasting frame for the new upholstery to be applied too!

Now just to select the material!

Updates will follow!

Kafka Lounge

I thought the best way to start off 2016 on the blog (a little late…….yes I know) would be to wrap up the Kafka lounge blog posts that I started last year in the lead up to our wedding – you can find them here.

In my last post I left with you with the finishing touches in preparation to use the lounge as a ‘love seat’ on the amazingly white sands of Jervis Bay.

So how did it all turn out you may ask? Excellent! See below!

Kafka Lounge

Now it wouldn’t be fair If I didn’t show off my beautiful bride on the day…………..

Mid Century, Wedding, Kafka, Australian
Concept delivered perfectly!

It was amazing to see the concept that I had pictured for all those months leading up to the wedding be captured on film by our wonderfully talented photographer – Pete, from Peter Izzard Photography. I cannot recommend him enough! You can find out more about his services here  – http://www.peterizzardphotography.com.au/

Until next time!