Lucky enough to come across a great matching set of Parker Nordic bedsides.
Condition was pretty good, however the leg on one had a previous repair which wasn’t quite up to standard, there was also a nasty gouge to the top edge and a small chip to the veneer on one drawer front.
Leg repair!Solid Timber Repair!Veneer repair!
With all repairs carried out, the original finish was given a light go over with some super fine steel wool, and then 2 coats of an oil/mineral turpentine mixture was applied.
Finished!
Very happy with the end results! The bedsides will be available in the online shop with the matching bed head very soon.
Over the weekend I carried out a few minor repairs on a great Hayson teak/veneer dressing table. A common issue often seen with the majority of teak furniture dating from the 1960’s can be chips/damage to the thin veneer. They are unsightly, can run further if caught whilst cleaning and also devalue your beautiful piece of furniture.
Sitting precariously!
For example, on the left hand side of the dresser, towards the bottom edge we are missing a 15mm x 20mm piece of veneer, along with a few other smaller nicks to the right. Obviously it’s not a major issue, it’s just there, and you know about it, and you hate how it’s damaged in that area, and how it catches your eye every time you walk past – much like a dent to your beloved car!
So how do we fix? We simply glue in another piece of teak veneer, and try to match it as best we can!
Left – little to dark / Right – better
The teak veneer used above I salvaged from a broken record player I stumbled across at the local tip one day. The piece to the left is a little to dark, and whilst the piece on the right is better – the grain however is a little wider and not quite as tight, but it will have to do!
Glueing / Taping / Finished.
So after squaring the edges, and meticulously peeling off a piece from the ‘donor’ it was trimmed, glued and clamped into place, along with a few smaller pieces (under the tape). Once the glue was dry I removed the clamp and I must say I was a little surprised at how much darker it looks now on its own compared to the side by side picture. A light sand with some 800 grit wet & dry, and a few coats of furniture polish (oil) and we’re done!
Now although the colour doesn’t quite match 100%, the repair is complete! The veneer’s are level, and firmly glued down, with no chance of any further damage occurring. Remember, we’re not trying to hide the repair or signs of it’s previous life – we’re ensuring the piece is in great, functional condition, ready for the next 50 years of use!
Sorry for the length of time between posts! Unfortunately time got a little short before my wedding, and thus the updates on the Kafka lounge have had to wait, however I was able to complete the freshen up before the big day, and use it exactly how I had planned!
I left you with the hand rests sanded, and ready for the finish to be applied. As they are firmly attached, removing wasn’t an option, so to prevent any of the finish getting on that majestic coloured vinyl, good old masking tape was used. Fiddly, however once on I didn’t have to be too concerned about any spillage or runs staining the vinyl!
Time consuming!
Once done, the finish was ready to be applied. In my very first post about the lounge I mentioned the different timbers used and how matching hand rests to the darker teak legs may be a little difficult. To try and darken the coachwood (hand rests) I experimented with a few different stains, and applications, and eventually settled on a mixture of 10:1 – being 10 parts danish oil to 1 part teak stain. Mixed together and applied with a soft, cotton cloth I was extremely happy with the results after 4 coats were applied. It really highlighted that grain in the left hand side hand rest!
Great finish!
With all the timber work now complete, all that was left was to fit the cheesecloth to the underside to cover up the ‘internals’, refit the timber legs and give the lounge a quick wipe over once more with the vinyl conditioner!
Neaten things up!
So how did it turn out…………? Guess you’ll have to wait until next time to see! 🙂
All pretty self explanatory! From the top left we have a comparison between a sanded teak leg to one with the original finish which I’ll use a guide for when it comes ‘colour matching’. Working clockwise we then have all 4 legs sanded. Due to only wanting to remove the original finish I didn’t have to go to harsh with the sandpaper. 240 grit was plenty enough to remove it, and then finish with a 400 grit which gave a great, super smooth finish.
Bottom left shows all 4 legs in my jig to apply the danish oil finish. This was after 1 coat, notice the matt finish, and how it will change to a higher gloss/sheen when more coats are applied. Also of note are the 2 distinctive shades of colour between the legs, with the longer legs (front) being darker. Bottom right shows the completed legs with 4 coats of Danish Oil applied. Very happy with the end result!
Ready for sanding.
With the legs now done and dusted, my attention turned indoors, and to the well worn hand rests. To remove what was left of the original shellac finish I used a cabinet style scraper. What you see above is the completed works.
Much Better.
With a steady hand and some 240 grit sandpaper I got to work being ever so careful to avoid the vinyl upholstery. An hour later and a few sheets less of sandpaper and I was done. I was super impressed with the grain on the left side hand rest. I couldn’t see it before through the shellac, but it’s looking like there’s a bit of fiddleback in there. Will be great to see how it shows up under the Danish Oil! A quick hit with some 400 grit to wrap things up and we’re just about ready to apply the new finish.
I’ll be moving reasonably quickly through the freshen up of the Kafka lounge, largely due to a major deadline looming (read wedding) in the next few weeks – I’m also a little ahead of where I’m posting about.
Tape & Vinyl Glue
So following on from the original clean, removing of stray paint and applying a conditioner to the vinyl we have now landed at the scratches and small tears to the original vinyl upholstery. The main one of note, is a small tear, approximately 15-20mm long x 2 – 3mm wide in the centre of the main cushion. What to do?
I did investigate the possibility of recovering the cushion, however to match the original colour and pattern of the vinyl was proving to be a difficult task, and to be honest probably more trouble than it was worth, so the decision was made to leave it as it, and just tidy up a few of the smaller nicks and scratches with some specific vinyl adhesive to stop them catching and going any further.
Once the adhesive was dry, I then moved onto removing the angular, tapered teak legs in preparation for refinishing. The legs were simply screwed into a threaded nut that ‘bites’ into the other side of the timber. Simple, yet effective.
With the legs removed I was faced with the dirty, well worn calico/cheesecloth cover to the underside of the lounge.
Calico or Cheesecloth?
I had always been in two minds in regards to replacing it. Looking back now I wonder how that thought could of ever entered my mind! Being a little tired made for lite work in removing the bottom cover. With 60 years of dust settled on it, I also discovered that originally it looks like it was light blue in colour, perhaps to blend just that little better. With the replacement I don’t think I’ll worry with the colour, just a nice clean piece of calico/cheesecloth to cover the ‘internals’ of the lounge, which by the way are in great shape for their age! No sagging springs or visible damage. Score.
Staples!
With the underside of the lounge now accessible, and a heap of old rusty staples looking at me square in the face (used to fix the calico cover) I got to work removing them all, one at a time. Not really necessary, and a lot of guys would just cover over the top, however my slightly obsessive compulsive nature wouldn’t let me do it. Much better in the long run I think.
Quick thing to note – It appears the slight angle on the front legs were achieved by using a small piece of masonite under the rear side of the front leg(s). Interesting.
So I’m getting married in just over a month, and my fiancee and I decided that – weather permitting, we would use this great teal/turquoise coloured 2 seater lounge designed and manufactured by Kafka as our ‘love seat’.
Being used solidly for the past 60 years has taken its toll (although small) on the lounge which is a little tired. Whats that mean? Well with time ticking away it’s time for a restoration, or perhaps more fitting, a ‘freshen up’.
No, thats not a shadow!
First of all comes a good vacuum, especially down behind the attached seat cushion. Although a little tight to get into, plenty of dirt and dust was removed. Then, and perhaps the most notable part – washing the vinyl covering. Nothing other than some warm water, soap, and a soft sponge produced the amazing result you see in the top 2 images (left half after – right half before).
It’s crazy to think that that much dirt, grease and grime was there. The other side affect from giving the vinyl a thorough clean, was the overall feel. Before washing, the vinyl was hard to touch and stiff, yet after the wash it felt super soft and nice to touch again. It definitely revitalised the vinyl, and with a vinyl conditioner applied once dry, it will only continue to get better!
Next was the stray white paint brush mark! With the vinyl having a very fine textured pattern, I didn’t want to use anything abrasive to try and remove the paint in the grooves, so I ended up using a super fine sewing pin to very gentle pick the white paint out of the grooves. Super time consuming, however it worked quite well!
Timber!
As you can see from the above picture, the timber hand rests have seen better days. The tinted shellac has started to flake off in places (like most shellac finished from the era) while the angular legs are looking a little tired.
The combination of timbers here are interesting. The hand supports are manufactured out of coachwood, whilst the legs are teak. Coachwood is naturally a lighter coloured timber, hence why a darker/tinted shellac was used as the finish – to try and match the darker, solid teak legs. May pose some difficulties down the track but we’ll cross that bridge in time!
I was lucky enough to come across this 2 seater lounge whilst on holidays. Looking quite familiar and with that amazing teal coloured vinyl I made it mine as quickly as I could!
The lounge appears to of been manufactured by Paul Kafka (I have done a post on him recently here) and although there are no visible maker’s labels or stamp, the styling is quite distinct and easy to identify with the angled legs, flared armrests, timber inserts (hand rests) and buttoned/stitched rear back support.
In need of a little love!
Overall the condition of the lounge is reasonable to good. There are a few nicks and one minor tear to the vinyl (also needs a thorough clean), the timber hand rests and legs need refinishing and the cheesecloth cover to the underside needs replacing and over the next few weeks I will be completing each as required.
With plans to use it as a loveseat at my upcoming wedding I’m really looking forward to getting stuck into it! I’ll be sure to update along the way.
Patina (as defined on Wikipedia) – is a thin layer that forms on the surface of stone; copper, bronze and similar metals (tarnish produced by oxidation or other chemical processes);[1] a sheen on woodenfurniture produced by age, wear, and polishing; or any such acquired change of a surface through age and exposure. Patinas can provide a protective covering to materials that would otherwise be damaged by corrosion or weathering. They may also be aesthetically appealing.
Now I have mentioned before that I love to hate the word, mainly due to it being so common and overused thanks to the likes of TV shows such as Pawnstars/American Restoration/American Pickers/etc. In saying that though, it’s a great descriptive word that describes the finish on so many of the items/pieces I come across.
In the pictures below you can clearly see the patina on the nickel plate finish on an antique display cabinet I am in the middle of restoring.
Nickel Plate Patina
Now some may cringe at removing years of ‘patina’ from the nickel plate finish (using Autosol and fine steel wool), however in this case you have to ask yourself what is the purpose of the piece being restored?
Well in this case, it’s an antique display cabinet. The nickel plate was meant to bright , shiny and polished. You’d walk into a store and bam! It’d be the first thing to catch your eye and lure you over to browse through the goodies it contained so for me it’s a no brainer.
In the next week or so I’ll do a blog post on another piece where the total opposite applies!
Following on from my previous post and with the handle screws both removed it was time to get down to the nitty gritty and see what I could do with the finish of the kettle.
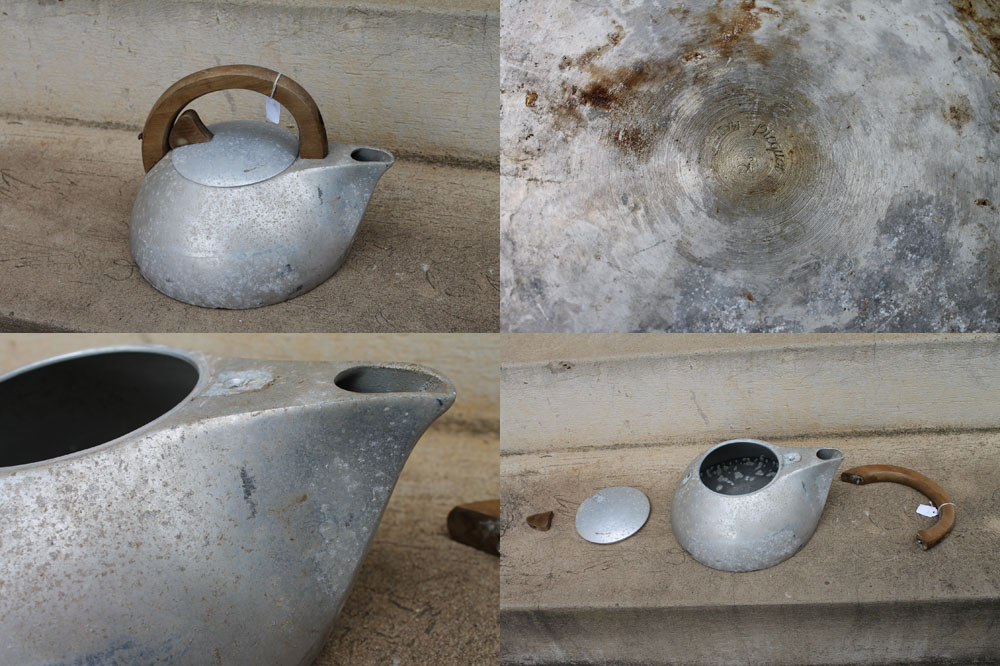
From looking around online I noticed that most, if not all of the Picquot ware kettles had a great, polished, highly reflective mirror finish. This is obviously achieved by a lot elbow grease and polishing. Now, an issue with my kettle as I briefly touched on in my last post is the corrosion and more so the pitting which is a direct result from living by the sea for decades.
Vintage 1950’s Kettle. Picquot Ware K3 Kettle
Starting with the lid (the smallest part….LOL) I used a fine (read 600 grit) wet and dry sandpaper but quickly noticed it was not abrasive enough due to the depth of the pitting, so I worked my way down basically to 120 grit and then back up again to finish off with 800 grit wet and dry before using autosol metal polish to achieve a great reflective finish.
As you can see in the photos there still is some pitting to the surface of the lid, and will always be until you really removed a decent amount of material from the surface (perhaps 0.10 – 0.20mm). This is definitely doable, however it will just take a fair………or great deal of time.
With the lid polished I was about to make a start on the body when I came to the realisation that I should leave it possibly as a project for a future owner, plus I really like the contrast between the old, dull and corroded body and the bright, vibrantly restored lid.
Before I reattached the handles I gave them a good oil with some Scandinavian Teak Oil which definitely helped to rejuvenate the tired timber. A little neverseize on the handle screws to try and prevent them from seizing up again and the kettle was back together.
Overall I think the kettle turned out pretty great. From walking away from it once at a garage sale in a far away coastal town, to it now sitting on display in our kitchen this piece will be sure to hang around another 50+ years.
Sometimes you walk away from an item, and question whether or not you’re doing the right thing. This can be said about this great kettle I came across at a garage sale on a recent holiday.
Awesome Picquot ware K3 Kettle
Looking pretty dirty and rough I had a quick look at it, noticed it’s interesting shape I thought to myself ‘you don’t really need another 50’s kettle do you?’ Well at that stage I didn’t, so I put it back down and continued to have a quick browse of the garage sale. Spotting nothing else of interest I turned and started to head back to the car and as you do (or as I do) when leaving a sale you turn and have one last glance to make sure you haven’t overlooked anything. Again, my eyes were drawn to the weighty aluminum kettle I earlier had picked up.
I turned around and slowly meandered back to the kettle and again picked it up and ran my eye over it. Still with a little self doubt on the actual ‘need’ for it I again almost put it down, however it’s interesting and smooth flowing shape got the better of me, so out came my wallet, leaving it a little lighter and away I went, kettle now in hand.
Once home (home) the search for information began, and to my surprise after trying various spelling variations on the Picquot name (slight corrosion and marking to the base made the makers mark had to read) up came the Picquotware K3 kettle along with it’s illustrious history. Read more here – http://www.picquotware.co.uk/history/
Now that the kettle had been identified, it was time to clean it up as you can see, the salty sea breeze had not been kind the magnesium/aluminium alloy. Another issue was the removal of the handle screws. Any type of steel screw/bolt into an alloy is going to create a drama, and this was the exact drama that I faced. Not wanting to snap off the handle screws I sprayed a little penetrant (WD-40 CRC 556 etc) under the wooden handles in hope it would soak into the thread and help loosen any corrosion between the 2 metals. I left this over night and by the morning both screws came out easily – crisis averted!