Tag Archives: Mid Century

Kafka Lounge – Part 4 – Completed!

Sorry for the length of time between posts! Unfortunately time got a little short before my wedding, and thus the updates on the Kafka lounge have had to wait, however I was able to complete the freshen up before the big day, and use it exactly how I had planned!

I left you with the hand rests sanded, and ready for the finish to be applied. As they are firmly attached, removing wasn’t an option, so to prevent any of the finish getting on that majestic coloured vinyl, good old masking tape was used. Fiddly, however once on I didn’t have to be too concerned about any spillage or runs staining the vinyl!

Preping for the finish!
Time consuming!

Once done, the finish was ready to be applied. In my very first post about the lounge I mentioned the different timbers used and how matching hand rests to the darker teak legs may be a little difficult. To try and darken the coachwood (hand rests) I experimented with a few different stains, and applications, and eventually settled on a mixture of 10:1 – being 10 parts danish oil to 1 part teak stain. Mixed together and applied with a soft, cotton cloth I was extremely happy with the results after 4 coats were applied. It really highlighted that grain in the left hand side hand rest!

Danish Oil & Teak Stain
Great finish!

With all the timber work now complete, all that was left was to fit the cheesecloth to the underside to cover up the ‘internals’, refit the timber legs and give the lounge a quick wipe over once more with the vinyl conditioner!

Underside cover for the 1950's lounge
Neaten things up!

So how did it turn out…………? Guess you’ll have to wait until next time to see! 🙂

Kafka Lounge – Part 3

Part 3 brings us the wood.

First off, the solid teak legs.

Danish Oiled Teak 1950's Legs
Before, During & After!

All pretty self explanatory! From the top left we have a comparison between a sanded teak leg to one with the original finish which I’ll use a guide for when it comes ‘colour matching’. Working clockwise we then have all 4 legs sanded. Due to only wanting to remove the original finish I didn’t have to go to harsh with the sandpaper. 240 grit was plenty enough to remove it, and then finish with a 400 grit which gave a great, super smooth finish.

Bottom left shows all 4 legs in my jig to apply the danish oil finish. This was after 1 coat, notice the matt finish, and how it will change to a higher gloss/sheen when more coats are applied. Also of note are the 2 distinctive shades of colour between the legs, with the longer legs (front) being darker. Bottom right shows the completed legs with 4 coats of Danish Oil applied. Very happy with the end result!

Retro Timber Coachwood Hand Rests
Ready for sanding.

With the legs now done and dusted, my attention turned indoors, and to the well worn hand rests. To remove what was left of the original shellac finish I used a cabinet style scraper. What you see above is the completed works.

240 grit sanding.
Much Better.

With a steady hand and some 240 grit sandpaper I got to work being ever so careful to avoid the vinyl upholstery. An hour later and a few sheets less of sandpaper and I was done. I was super impressed with the grain on the left side hand rest. I couldn’t see it before through the shellac, but it’s looking like there’s a bit of fiddleback in there. Will be great to see how it shows up under the Danish Oil! A quick hit with some 400 grit to wrap things up and we’re just about ready to apply the new finish.

Kafka ‘Freshen Up’ – Part 2

I’ll be moving reasonably quickly through the freshen up of the Kafka lounge, largely due to a major deadline looming (read wedding) in the next few weeks – I’m also a little ahead of where I’m posting about.

Repairing Mid Century Furniture
Tape & Vinyl Glue

So following on from the original clean, removing of stray paint and applying a conditioner to the vinyl we have now landed at the scratches and small tears to the original vinyl upholstery. The main one of note, is a small tear, approximately 15-20mm long x 2 – 3mm wide in the centre of the main cushion. What to do?

I did investigate the possibility of recovering the cushion, however to match the original colour and pattern of the vinyl was proving to be a difficult task, and to be honest probably more trouble than it was worth, so the decision was made to leave it as it, and just tidy up a few of the smaller nicks and scratches with some specific vinyl adhesive to stop them catching and going any further.

Once the adhesive was dry, I then moved onto removing the angular, tapered teak legs in preparation for refinishing. The legs were simply screwed into a threaded nut that ‘bites’ into the other side of the timber. Simple, yet effective.

With the legs removed I was faced with the dirty, well worn calico/cheesecloth cover to the underside of the lounge.

Killer 50's Retro Chair
Calico or Cheesecloth?

I had always been in two minds in regards to replacing it. Looking back now I wonder how that thought could of ever entered my mind! Being a little tired made for lite work in removing the bottom cover. With 60 years of dust settled on it, I also discovered that originally it looks like it was light blue in colour, perhaps to blend just that little better. With the replacement I don’t think I’ll worry with the colour, just a nice clean piece of calico/cheesecloth to cover the ‘internals’ of the lounge, which by the way are in great shape for their age! No sagging springs or visible damage. Score.

Teal Vinyl Australian Lounge
Staples!

With the underside of the lounge now accessible, and a heap of old rusty staples looking at me square in the face (used to fix the calico cover) I got to work removing them all, one at a time. Not really necessary, and a lot of guys would just cover over the top, however my slightly obsessive compulsive nature wouldn’t let me do it. Much better in the long run I think.

Quick thing to note – It appears the slight angle on the front legs were achieved by using a small piece of masonite under the rear side of the front leg(s). Interesting.

Kafka ‘Freshen Up’ – Part 1

So I’m getting married in just over a month, and my fiancee and I decided  that – weather permitting, we would use this great teal/turquoise coloured 2 seater lounge designed and manufactured by Kafka as our ‘love seat’.

Being used solidly for the past 60 years has taken its toll (although small) on the lounge which is a little tired. Whats that mean? Well with time ticking away it’s time for a restoration, or perhaps more fitting,  a ‘freshen up’.

Kafka Lounge Mid Century
No, thats not a shadow!

First of all comes a good vacuum, especially down behind the attached seat cushion. Although a little tight to get into, plenty of dirt and dust was removed. Then, and perhaps the most notable part – washing the vinyl covering. Nothing other than some warm water, soap, and a soft sponge produced the amazing result you see in the top 2 images (left half after – right half before).

It’s crazy to think that that much dirt, grease and grime was there. The other side affect from giving the vinyl a thorough clean, was the overall feel. Before washing, the vinyl was hard to touch and stiff, yet after the wash it felt super soft and nice to touch again. It definitely revitalised the vinyl, and with a vinyl conditioner applied once dry, it will only continue to get better!

Next was the stray white paint brush mark! With the vinyl having a very fine textured pattern, I didn’t want to use anything abrasive to try and remove the paint in the grooves, so I ended up using a super fine sewing pin to very gentle pick the white paint out of the grooves. Super time consuming, however it worked quite well!

Mid Century Australian Lounge
Timber!

As you can see from the above picture, the timber hand rests have seen better days. The tinted shellac has started to flake off in places (like most shellac finished from the era) while the angular legs are looking a little tired.

The combination of timbers here are interesting. The hand supports are manufactured out of coachwood, whilst the legs are teak. Coachwood is naturally a lighter coloured timber, hence why a darker/tinted shellac was used as the finish – to try and match the darker, solid teak legs. May pose some difficulties down the track but we’ll cross that bridge in time!

More updates next week!

Amazing.

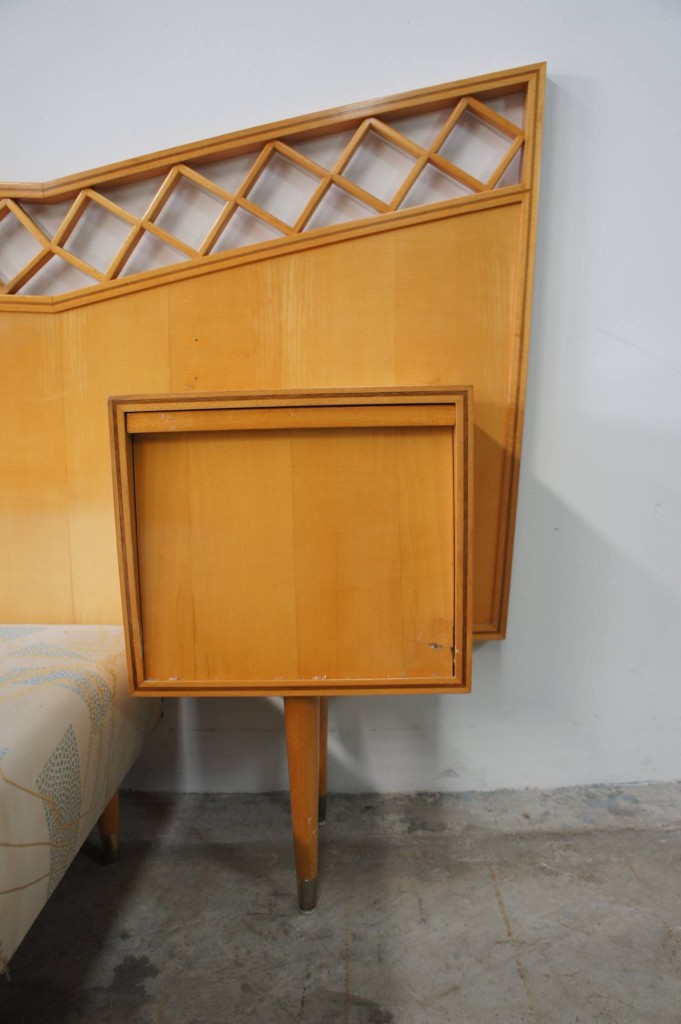
Every once in a while you’ll come across a piece of furniture that completely blows your mind. For me, this happened today whilst browsing an Australian Mid Century group on Facebook.

Rosando Bros Bed?
Crazy Crazy good!

In architecture, you’d call the lines and design adorning the top of the front and rear bedheads – a butterfly roof, popularised in the post war period and so common to many mid century designed homes.

Rosando Bro's Mid Century
Beautiful lines!

Here they’ve applied the same design and principals to what otherwise is normally rectangular in shape (and boring!) and created something amazing and beautiful.

1950's Bed frame - Australian
Design & practicality.

Apparently the new owners came into possession of the bed after purchasing a mid century modern home in Melbourne, and believe the manufacturer to be the Rosando Brothers. After looking through some other images of their work here, there definitely appears to be a strong resemblance in both style and design when compared to some of their other known work. I wish the new owners all the best with their amazing find!

Amazing Kafka 2 Seater Lounge

Check this out.

Mid Century Lounge
2 Seater Kafka Lounge

I was lucky enough to come across this 2 seater lounge whilst on holidays. Looking  quite familiar and with that amazing teal coloured vinyl I made it mine as quickly as I could!

The lounge appears to of been manufactured by Paul Kafka (I have done a post on him recently here) and although there are no visible maker’s labels or stamp, the styling is quite distinct and easy to identify with the angled legs, flared armrests, timber inserts (hand rests) and buttoned/stitched rear back support.

Mid Century Australian Lounge
In need of a little love!

Overall the condition of the lounge is reasonable to good. There are a few nicks and one minor tear to the vinyl (also needs a thorough clean), the timber hand rests and legs need refinishing and the cheesecloth cover to the underside needs replacing and over the next few weeks I will be completing each as required.

With plans to use it as a loveseat at my upcoming wedding I’m really looking forward to getting stuck into it! I’ll be sure to update along the way.


The Right Shade

I’ve owned this great mid century teak ‘rocket style’ lamp for a little while now, and it has always donned the cream, coolie lamp shade. Although reasonable in style, it just never felt quite right.

Mid Century Teak Lamp
Ready for take off!

With the 3 legged tripod base, and the narrow, tapering central column the wide based coolie shade was a little top heavy. How much though I never realised until just recently when I came across this fantastic, original teal and gold drum style lamp shade.

Teal, or Cream?
Teal, or Cream?

With the teal shade firmly in my possession I was keen to try it out on the rocket lamp and see how it looked. I was super impressed not only with how well the teal contrasted against the teak, but also in it’s proportions. The drum style shade seems to suit the lamp perfectly, and allows the overall flow to continue on up, compared to the coolie style shade which I feel halted the flow – the shape – the design of the original lamp!

Now residing in our lounge room, with the teal shade firmly atop, the teak rocket style lamp will soon be joined by another teal coloured item. Possibly my favourite piece. Blog post and images to come!

Makers Labels

Hi.

Here is a chair. I purchased this chair a few years ago.

Single retro chair
Great mid century CRO chair.

It was originally in a set of 5 with the matching table. Although at the time I was tight for space so just settled on this one. Regret? Kind of now yes, but why did I purchase just this one chair?

The secret lies underneath.

Original mid century paper tag/makers label. CRO of Sydney.
Original mid century paper tag/makers label. C.R.O Furniture of Sydney.

As soon as I flipped the chair and saw the original cardboard makers tag still stapled underneath I knew I had to have it. Yes it was a shame to split it from the set (only 5 chairs originally so I didn’t feel too bad…..) but you can be sure I’ll come across these chairs and table in the future, an original tag though? Maybe a little more difficult. The 50 year old dust came at no extra cost also. Bargain!

Dust for free? You bet!


Mystery Fler ‘Tub’ Style Lounge Suite Update

Towards the end of last year, I posted about a mystery fler tub style lounge I had in storage. You can read that post here.

Often when searching for information on unknown (ish) pieces you come across it when you least expect it. This is what happened a few weeks ago when browsing through a small op shop in the southern highlands.

To my surprise I stumbled across the exact same chair from the 3 piece suite I have, in an original covering.

Original Covering - Fler Tub Lounge Chair
Original Covering – Fler Tub Lounge Chair

What’s even better is the original label was still attached, and perfectly legible, and although I didn’t have room to take it home, I made sure I got a picture of the label, which may shed some light on the design/name of the lounge chair/suite.

Fler label, from the tub style mystery lounge chair.

Now as you can see, we have ‘Airborne Europe Licence’ printed across the bottom of the maker’s label. This tells me that this particular style/design wasn’t an original Fler idea, more so they purchased the licence from an overseas company (based in Europe) to produce/sell this style of lounge chair/suite in Australia.

Now to search for more information on ‘Airborne’. A quick google search for ‘Mid Century Airborne Furniture’ brought up a few results, and not surprisingly a lot of very similar styled/design lounge suites and chairs, encompassing big bold curves with plenty of fibreglass.

Airborne appears to be a French furniture company that started during the 1950’s, however the fibreglass element looks to of been introduced during the late 1960’s – early 1970’s. A look on 1stdibs is worthwhile for interests sake, see here.

Unfortunately thus far I haven’t been able to identify the exact style of suite (still!) or possibly a designer, however as I mentioned above, when I’m least expecting it, I’m sure the next piece of the puzzle will present itself!