Category Archives: Restoration Projects

Category for items that will be/have been restored.

Possible Snelling? TV/Easy/Arm Chair Update

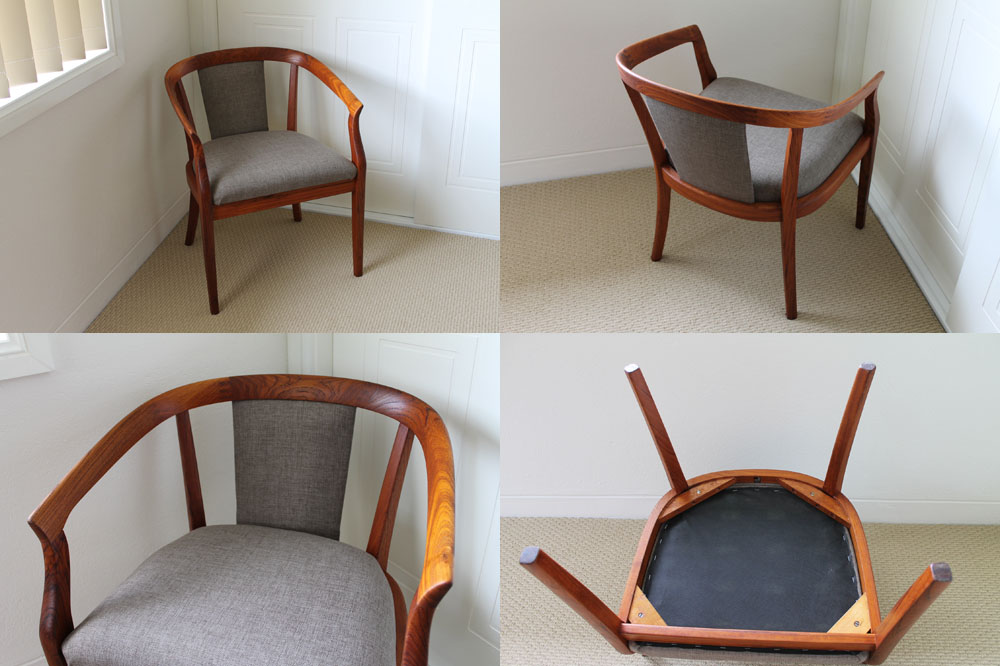
Its been a little while since I last posted on this chair here so I thought it was time for an update seeing as though it’s sneaking its way into the background of a few my recent items, both on eBay and the online store.

Since that time the chair has been reassembled and given a couple of coats of oil to bring it to the stage that it is at below.

Silky Oak TV/Arm/easy chair

The silky oak timber came up an absolute treat!

Now onto the upholstery……I feel that the boomerang shape of the chair, along with the stunning silky oak is to good to cover and hide away from the day of light so I’m pretty positive I’m going to go with webbing only, much like the Snelling and Jens Risom designer chairs.

I’ve sampled a few different colours of webbing against the timber, and because of how rich and deep the colour is red and black webbing blend in to much, i.e the colour does not contrast against the timber. White however, much like these chairs is excellent and provides an excellent contrast against the silky oak. Stay tuned.

Space Age Coffee Table Restoration Update # 2

Busy day today with a good amount of progress. Continuation from yesterdays post below

STEP 3

I was now able to start on the sanding with all the pieces repaired/re-manufactured. Because all of the pieces were coated in the original varnish/shellac finish I started off using some 60 grit sandpaper on my orbital sander. This grit is quite rough but made quick work on the original coating. Once all the pieces were done I moved onto some 150 grit paper. Repeated the process for all pieces and then moved onto some 320 grit paper for the finishing sand. All came up quite nicely as you can see below.

Sanded pieces of a 1960's Coffee Table

STEP 4

With all the pieces of the coffee table now repaired and sanded I started on the reassembly. A fairly straight forward job as all the holes are pre-existing and lined up quite easily. Glued and screwed the legs to the mounting blocks to provide extra stability.

1960's Coffee Table restoration project

You can see that classic space age design appearing again.

STEP 5

With the coffee table now reassembled it’s time to apply a finish. The original finish was a golden oak colour with a shellac/varnish applied over the top. I’m going to go for a darker  (teak colour) oiled finish. I think it will complement the darker teak colours of the retro lounge suites and sideboards it will share it’s space with.

I’ve had quite good success with previous pieces I have restored using a mix of Linseed Oil, Teak Stain and Turps in a 2:1:1 ratio. The reason I add the Teak stain in there is because Victorian Ash in its raw form is a very light coloured timber (white to almost pink) so the stain adds a nice Teak colour to it.

After mixing the 3 elements in my mixing container (lol) I simply apply the finish using a soft cotton cloth. I will reapply the finish 4-5 times letting each coat dry before re-applying. The great thing about having the Linseed Oil mixed in is that once the finish has been applied, that’s it! No need to re-oil over the stain.

Here’s a sneak peak at how its coming along after 2 coats this afternoon.

The applying of an oil based finish to a retro coffee table

Keep an eye out for the finished product next week!

Next restoration project is ready for Blast Off!

With the restoration of the Parker chair complete I thought I’d share a few photos of my next project.

This Victorian Ash coffee table has a real space age design to it with it’s lunar landing craft style legs and half floating table top due to a clever triangular design supporting piece hidden away under the centre of the table top.

Unfortunately this coffee table has seen better days. The top is caked with food build up (yuk!), scratches to the painted underside of the glass top, various stains to the finish, one leg has been replaced with a not so matching piece and the draw doesn’t quite slide correctly.

With all restoration projects you need to weigh up whether or not the amount of time and effort you put into a piece will be worth the end result. Sometimes not, so you will pass on the piece or approach it in a different way – aka – http://www.stillbroke.com.au/blog/2012/03/21/mirror-mirror-on-the-wall/

This one however for me ticks all the boxes needed to perform a restoration. We have –

  • Great Design and Shape (Most important)
  • Maker’s label underneath (Help to identify the piece when planning to sell)
  • Easy materials to work with (Being made of timber)

Looking forward to making a start on it!

Retro 1960's Coffee Table

Restoration Complete!

Well, its done! I finished off the restoration of the Parker chair over the weekend, and I must say I am very happy with the results.

Sporting new elastic webbing, fresh dunlop foam on both the seat and back support and   new upholstery, this chair has been brought back to the condition it was when it rolled out of the Parker factory over 35 years ago!

The chair will be for sale on the website within the next few weeks, or alternatively if interested you can contact me via the contact page on the blog.

Retro Teak Parker ChairI’d also like to thank Laura and Katie from Flourish and Blume who gave me some great advice on materials and specific upholstery techniques. The girls were extremely friendly and helpful!

Be sure to check out their blog here —> http://flourishandblume.blogspot.com.au/        They do some awesome quality work which most definitely provides inspiration for myself.

I’ll also add their blog to my list of recommended links on the home page.


Parker ‘Captains’ Chair Update

Thought I’d share a few progress pictures of the Parker chair I am currently restoring.

In the last update I had just finished sanding back the frame. After cleaning the dust off I made up a 50/50 mix of linseed oil and mineral turpentine (turps) and applied it using a cotton cloth. I repeated the process once a day for 3 days and finished it off by buffing the frame with a soft cloth.

As you can see the results are very impressive! The finish really highlighted the beautiful grain of the teak.

Stay tuned for the final part of the restoration, the re-upholstering of the seat and back support

Retro Teak Parker chair

Restoration project – Retro Teak Parker Chair

One of my items that I am currently restoring is this beautiful retro teak Parker chair. It was in quite a state as you can see when I first picked it up but its lovely curving design caught my eye.

The exposed finger joints and beautiful grain (although slightly hidden due to weathering) only reinforced what a quality piece this once was, and upon closer inspection I found a makers label – Parker.

The chair is structurally very sound. The teak timber finish and upholstery however are not due to weathering (more than likely this chair was outside on someones veranda/back deck/patio).

After removing the seat and back rest I started to sand the entire frame with some 80 grit sand paper, always sanding with the grain. Once that was done I started again using a smoother grade of sandpaper – 180 grit this time. Once completed I moved up to some 400 grit sand paper for the final sand.

I am very impressed with the result so far.

Vintage Teak Parker Chair